Pastel Ripple Wall Hanging Free Crochet Pattern with Tassel Trio
Introduction
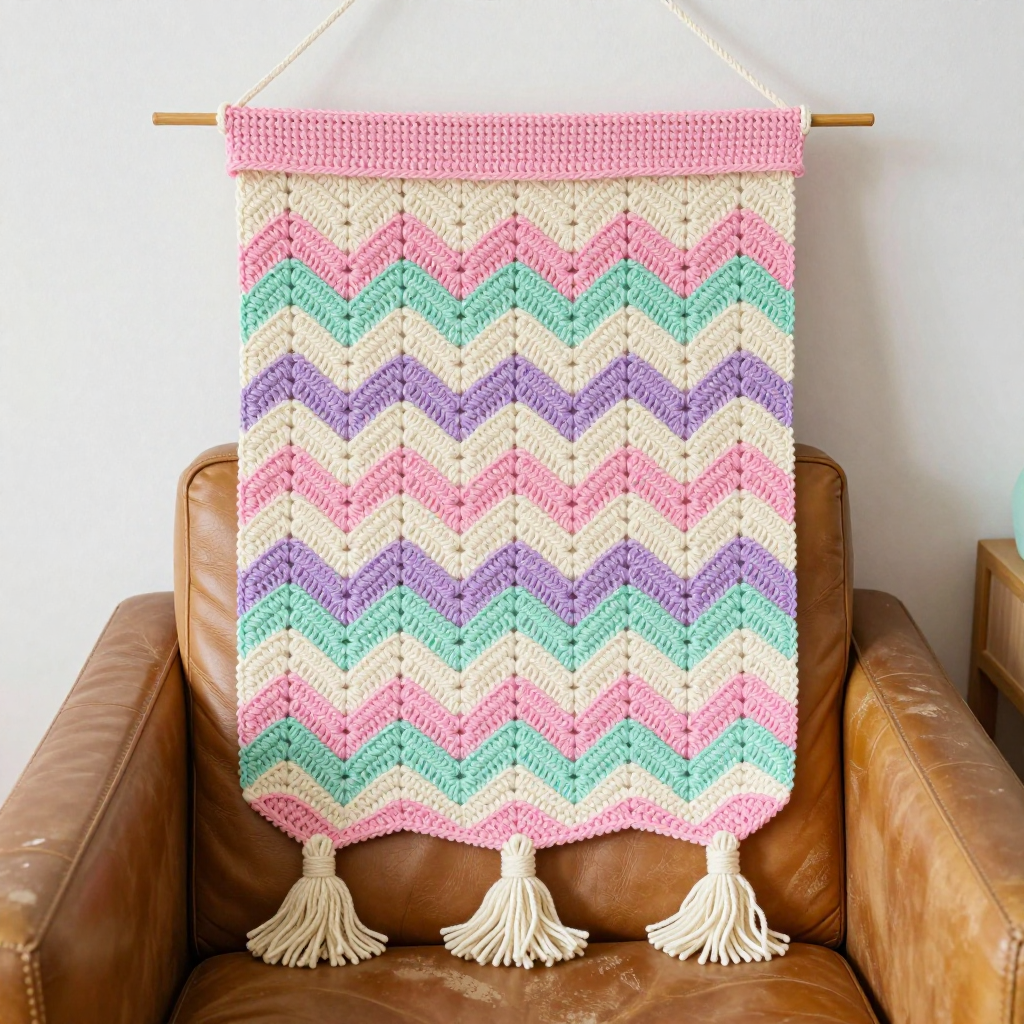
This pastel ripple wall hanging is the perfect project for anyone who has mastered basic double crochet and wants to make something that actually goes on the wall. Worked in soft cotton macrame cord, the chevron texture gives it a gentle desert-boho feel, while the candy stripes of pastel pink, mint, lilac and cream keep it light and modern. It measures about 14 x 20 inches, so it fits beautifully above a dresser, in a nursery, or at the end of a hallway. Three simple cord tassels along the bottom edge and a dowel hanger finish it off, and the whole panel works up quickly because the ripple repeat is easy to memorize.
Materials Needed
- Yarn: 3 mm (approx. worsted/bulky-light) single-strand twisted cotton macrame cord. Color A pastel pink: 60 yd; Color B pastel mint: 45 yd; Color C pastel lilac: 45 yd; Color D cream: 30 yd. Extra cream cord for tassels: 18 lengths of 12 in cord (6 per tassel).
- Hook: 5.0 mm (US H-8) crochet hook.
- Notions: Tapestry needle, scissors, 12 in wooden dowel, 24 in of cord for the hanger, a ruler, and a steamer or spray bottle for blocking.
- Finished size: Panel approx. 14 in wide x 20 in tall (35.5 x 51 cm), excluding tassels. Tassels approx. 5 in (12.5 cm) long. Total hanging height approx. 26 in (66 cm) including the 12 in dowel.
Abbreviations
- ch – chain: make a loop of yarn and pull it through the loop on your hook.
- dc – double crochet: yarn over, insert hook in stitch, pull up a loop, yarn over and pull through two loops, yarn over and pull through the last two loops.
- dc3tog – double crochet 3 together: work three double crochet stitches together so they share one top, creating a decrease (this forms the valley of the ripple).
- sc – single crochet: insert hook in stitch, pull up a loop, yarn over and pull through both loops.
- st(s) – stitch(es).
- RS – right side: the front, public face of the panel.
- WS – wrong side: the back face of the panel.
- rep – repeat.
Gauge
14 sts x 8 rows = 4 in (10 cm) in ripple pattern after blocking; each ripple repeat (17 sts) measures approx. 4.75 in (12 cm) wide. To check, work a small swatch in the ripple pattern, block it lightly, and measure a 4 in section in the middle of the fabric.
Tips Before You Start
- Count your stitches at the end of every row. Each row should stay at 51 sts, and a missed valley or peak will throw off the chevron line quickly.
- Always skip 2 sts at each valley and work 3 dc in each peak stitch — this is what creates the wave, so keep the rhythm consistent.
- Change colors at the end of the last row of a color block, before you chain 2 to turn, so the new color starts cleanly on the next row.
- Macrame cord can twist as you work; let your hook hang and untwist every few rows so the panel lies flat and the texture stays even.
Step-by-Step Instructions
Panel
Notes: Ripple repeat = 17 sts (2 valleys, 1 peak). Ch a multiple of 17 + 2. Always skip 2 sts at each valley and work 3 dc in each peak st. Ch 2 at row start does not count as a st unless noted.
With A, ch 53 (3 repeats + 2).
R1 (RS): dc in 3rd ch from hook, dc in next 6 ch, [dc3tog over next 3 ch] twice, dc in next 6 ch, 3 dc in next ch, dc in next 6 ch, [dc3tog over next 3 ch] twice, dc in next 6 ch, 3 dc in next ch, dc in next 6 ch, [dc3tog over next 3 ch] twice, dc in last 7 ch (51 sts).
R2: ch 2, turn, dc in first 7 sts, [dc3tog] twice, dc in next 6 sts, 3 dc in next st, dc in next 6 sts, [dc3tog] twice, dc in next 6 sts, 3 dc in next st, dc in next 6 sts, [dc3tog] twice, dc in last 7 sts (51 sts).
R3-4: rep R2 in A (51 sts).
Change to B. R5-8: rep R2 (51 sts).
Change to C. R9-12: rep R2 (51 sts).
Change to D. R13-14: rep R2 (51 sts).
Change to A. R15-18: rep R2 (51 sts).
Change to B. R19-22: rep R2 (51 sts).
Change to C. R23-26: rep R2 (51 sts).
Change to D. R27-28: rep R2 (51 sts).
Change to A. R29-32: rep R2 (51 sts).
Change to B. R33-36: rep R2 (51 sts).
Change to C. R37-40: rep R2 (51 sts). Fasten off, weave ends. Block to 14 x 20 in.
Top Sleeve
With A, join cord at top-right corner of panel.
R1: sc evenly across top edge (51 sc).
R2-3: ch 1, turn, sc in each st (51 sc). Fasten off.
Fold sleeve to WS and whipstitch lower edge to R1, leaving both short ends open.
Tassels (make 3, cream)
For each tassel: hold 6 lengths of 12 in cord together and fold in half. Tie a 6 in cord tightly around the bundle 1 in below the fold to form the tassel head; wrap 6-8 times, tie off, and trim ends evenly.
Attach one tassel to each valley point along the bottom edge (3 valleys) using a lark's head knot through the dc3tog stitch, spacing them evenly approx. 4.75 in apart. Trim tassel ends level at 5 in.
Hanging
Insert the 12 in dowel through the top sleeve. Tie a 24 in cord to each dowel end for the hanger, and knot the ends. Steam lightly to relax the cord.
Assembly and Finishing
Weave in all yarn ends on the wrong side of the panel, working them along the color blocks so they don't show through the open ripple texture. Whipstitch the sleeve's lower edge neatly to the first sc row, keeping both short ends open so the dowel can slide through. Block the panel to 14 x 20 in by misting it lightly and pinning it flat, or steam it gently; let it dry completely before hanging. Slide the dowel through the sleeve, tie the hanger cord to each end, and check that the three tassels hang evenly and level before you trim any final ends.
Pro Tips and Variations
- Swap the pastel palette for warm terracotta, mustard and cream for a richer autumn look, or use one solid color for a minimal, textured piece.
- Make a longer version by adding more 17-stitch repeats to the starting chain (each repeat adds about 4.75 in of width) and keeping every row at the new stitch count.
- For a fuller tassel trio, use 8 lengths of cord per tassel instead of 6, and wrap the tassel head a few extra times for a chunkier finish.