Pineapple Bobble Crochet Cardigan Free Pattern
Introduction
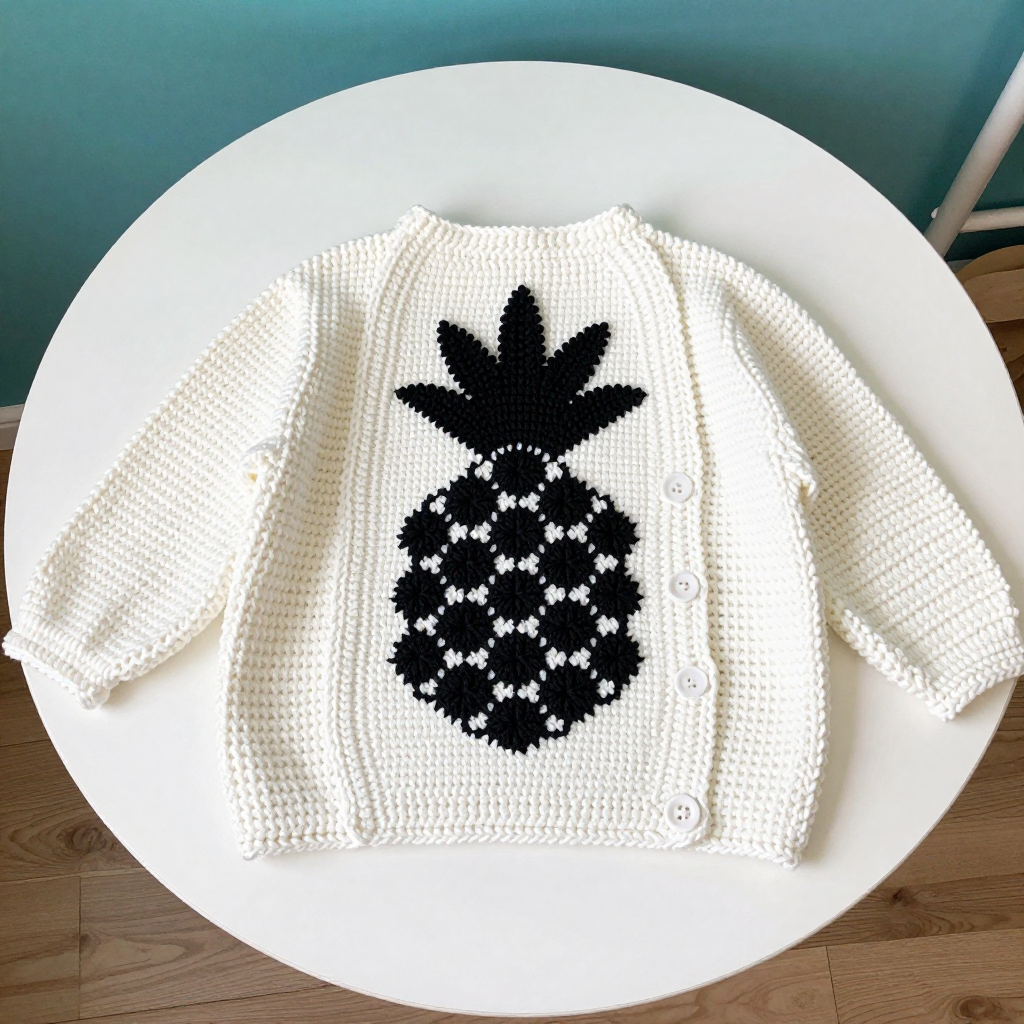
This Pineapple Bobble Crochet Cardigan is a sweet, tropical little layer made for kids and for crocheters who are just finding their feet with colorwork and texture. It's worked in soft worsted weight acrylic in crisp white with a bold black pineapple worked in bobble stitches across the back, so it looks striking but stays simple to make. The body is a straight rectangle with no waist shaping, which means no tricky increases or decreases to worry about, and the sleeves are plain tapered tubes. The finished cardigan is boxy and easy to throw on, warm without being heavy, and the bobbles give the pineapple a fun, squishy texture that little hands love to touch.
Materials Needed
- Yarn: Worsted weight acrylic. Main color (MC) white: 400 (500, 600) yds. Contrast color (CC) black: 150 (200, 250) yds.
- Hook: 5.0 mm (US H-8) crochet hook.
- Notions: Stitch markers, tapestry needle, 3 (4, 4) buttons about 1/2 inch (12 mm), scissors.
- Finished size: Chest 24 (26, 28) inches; length 14 (16, 18) inches; sleeve length 8 (10, 12) inches. Sizes are written as smallest (medium, largest).
Abbreviations
- ch – chain: yarn over and pull through the loop on your hook.
- sl st – slip stitch: insert hook, yarn over, pull through both the stitch and the loop on your hook.
- sc – single crochet: insert hook, yarn over, pull up a loop, yarn over, pull through both loops.
- hdc – half double crochet: yarn over, insert hook, yarn over, pull up a loop, yarn over, pull through all three loops.
- bo – bobble: [yarn over, insert hook in stitch, yarn over, pull up a loop, yarn over, pull through 2 loops] 3 times, yarn over, pull through all 4 loops on hook.
- inc – increase: work 2 hdc in the same stitch.
- RS / WS – right side / wrong side of the fabric.
- MC / CC – main color (white) / contrast color (black).
Gauge
14 stitches and 16 rows = 4 inches in half double crochet. Work a small swatch in hdc, measure it, and change hook size if your stitch count per 4 inches doesn't match before you begin.
Tips Before You Start
- Count your stitches at the end of every row. The body is a straight rectangle, so a dropped or extra stitch will show up as a wavy edge later.
- Keep your color changes tidy by carrying the unused color loosely along the wrong side and twisting the two yarns where they meet so no gaps appear.
- Bobbles push to the right side of the fabric. Work them a little firmly so they pop out clearly against the white background.
- Try the body on (or measure it flat) before you divide for the armholes to make sure the length suits your child.
Step-by-Step Instructions
Body (MC)
Row 1: Ch 86 (94, 102), hdc in 3rd ch from hook and each ch across (84 (92, 100) hdc).
Rows 2-4: Ch 2, turn, hdc in each st across (84 (92, 100) hdc).
Pineapple Motif (CC)
Work in hdc with bobbles following the chart, changing color as indicated. The chart is 20 sts wide and 24 rows tall and is centered on the back. For sizes 24 and 28, center the chart within the row; for size 26 it fits exactly. Work even in hdc, following the chart for color changes. After the chart, continue in MC until the piece measures 8 (9, 10) inches from the start, ending with a WS row.
Divide for Armholes
Next row (RS): Hdc in first 20 (22, 24) sts (right front), ch 4 (5, 6), skip next 4 (5, 6) sts for armhole, hdc in next 36 (38, 40) sts (back), ch 4 (5, 6), skip next 4 (5, 6) sts, hdc in last 20 (22, 24) sts (left front) (80 (86, 92) sts including chs).
Left Front
Work even in hdc on 20 (22, 24) sts until the armhole measures 4 (5, 6) inches. Fasten off.
Back
With WS facing, join MC to the first st of the back and work even in hdc on 36 (38, 40) sts until the armhole measures 4 (5, 6) inches. Fasten off.
Right Front
With WS facing, join MC to the first st of the right front and work even in hdc on 20 (22, 24) sts until the armhole measures 4 (5, 6) inches. Fasten off.
Sleeves (make 2, MC)
Set-up: Ch 30 (34, 38), join to form a ring, being careful not to twist.
Rnd 1: Ch 2, hdc in each ch around, join with sl st to first hdc (30 (34, 38) hdc).
Rnds 2-4: Ch 2, hdc in each st around, join (30 (34, 38) hdc).
Inc rnd: Ch 2, hdc in first st, 2 hdc in next st, hdc in each st to last 2 sts, 2 hdc in next st, hdc in last st, join (32 (36, 40) hdc).
Next: Repeat the inc rnd every 4 (4, 5) rnds 2 (3, 3) more times (36 (42, 46) hdc).
Final: Work even until the sleeve measures 8 (10, 12) inches. Fasten off.
Edging (MC)
Join MC at the bottom right corner.
Rnd 1: Ch 1, sc evenly around the entire outer edge (bottom, right front, neck, left front), working 3 sc in each corner, join with sl st to first sc.
Rnd 2: Ch 1, sc in each sc around, working 3 sc in each corner, join. Fasten off.
Button Loops (MC)
Join MC at the right front edge at the desired button placement. Ch 4, sl st in the same st, fasten off. Make 3 (4, 4) loops evenly spaced. Sew buttons opposite the loops on the left front.
Assembly and Finishing
Sew the shoulder seams with the tapestry needle and matching yarn. Sew the sleeve caps into the armholes, easing the sleeve to fit. Sew the side seams from the underarm to the bottom edge. Weave in all ends neatly on the wrong side. Block lightly by misting with water and pinning to the finished measurements, then let it dry flat.
Pro Tips and Variations
- Swap the black pineapple for a bright yellow or green CC for a sunnier, more colorful look.
- Add a simple sc border in CC around the cuffs and bottom edge to tie the colors together.
- For a longer cardigan, add extra even hdc rows in MC before dividing for the armholes, keeping the same stitch counts.