Plum Post-Rib Yarn Bowl Free Crochet Pattern
Plum Post-Rib Yarn Bowl Free Crochet Pattern
Introduction
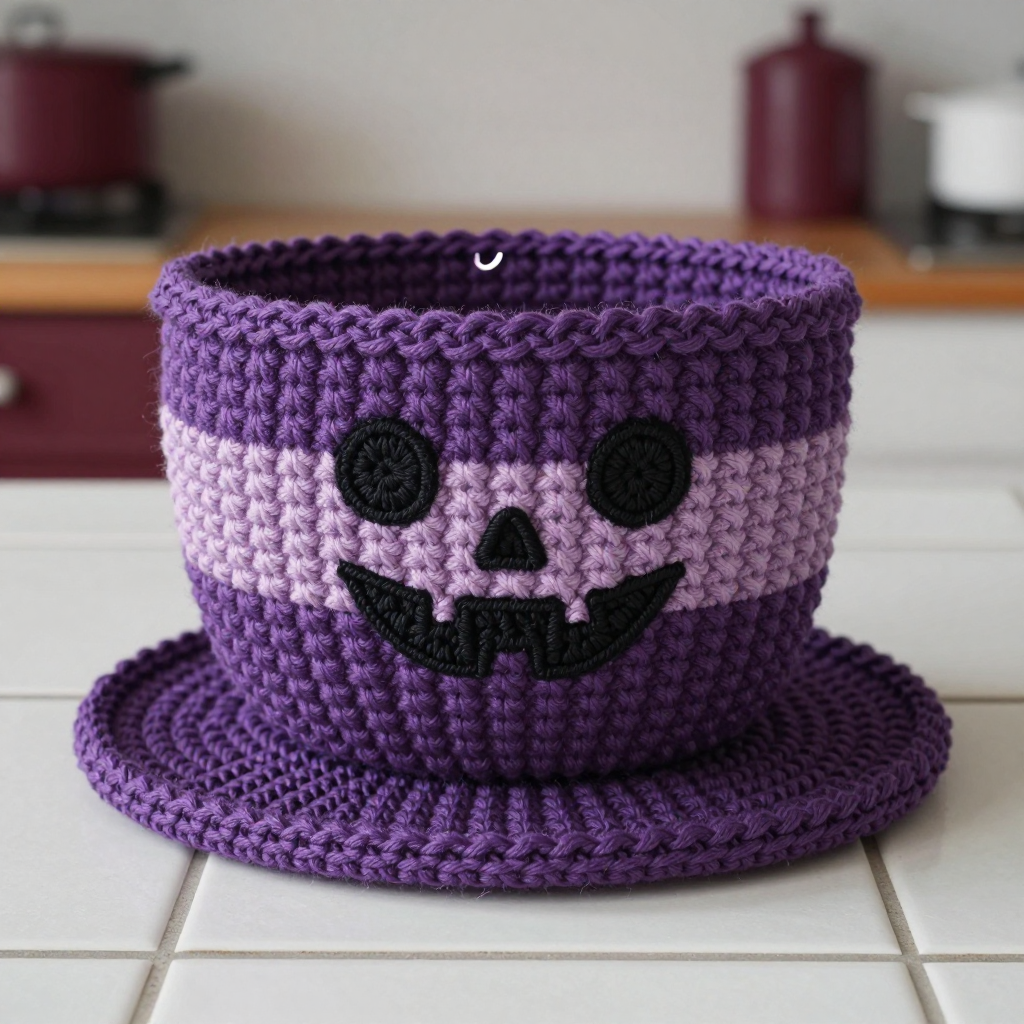
This little plum yarn bowl is the perfect companion for cozy Halloween crafting sessions — it holds your working ball of yarn so it doesn't roll off the couch while you stitch. Worked in front-post and back-post single crochet ribbing with sturdy 3 mm macrame cord, it stands up on its own and has a lovely vertical ribbed texture that feels firm and satisfying in the hand. A two-round mauve stripe and a kawaii jack-o'-lantern face give it a sweet, spooky personality, and a stretched yarn guide hole at the front keeps your strand feeding smoothly. It's a beginner-friendly project built almost entirely from single crochet, so even if this is your first bowl, you can finish it in an evening or two.
Materials Needed
- Yarn: Macrame cord, 3 mm, cotton. Color A (plum): 70 yd. Color B (mauve): 10 yd. Color C (black): 2 yd.
- Hook: 5.0 mm (US H-8) crochet hook
- Notions: Stitch marker, tapestry needle, scissors, measuring tape
- Finished size: Approx. 4.5 inches (11.5 cm) diameter and 3.5 inches (9 cm) tall
Abbreviations
- ch — chain: make a loop of yarn and pull it through the loop on your hook.
- sc — single crochet: insert hook, pull up a loop, yarn over, pull through both loops.
- inc — increase: work 2 single crochet stitches into the same stitch.
- sl st — slip stitch: insert hook, yarn over, pull through everything on the hook.
- MR — magic ring: an adjustable loop you crochet into, then pull closed.
- blo — back loop only: work into the loop of the stitch farthest from you.
- fpsc — front post single crochet: work the stitch around the post of the stitch below, coming from the front.
- bpsc — back post single crochet: work the stitch around the post of the stitch below, coming from the back.
- sts — stitches
Gauge
12 sts and 12 rows = 4 inches (10 cm) in post-ribbing pattern. To check, crochet a small swatch in the fpsc/bpsc ribbing and measure a 4-inch section; adjust your hook size if you have more or fewer stitches than 12 per 4 inches.
Tips Before You Start
- Macrame cord is stiff, so keep your tension relaxed — pulling too tight makes the post stitches hard to work into on the next round.
- Mark the first stitch of every round; the ribbing pattern makes it easy to lose your place.
- Work the base flat and check it lies flat before starting the body — if it cups, go up a hook size.
- Plan your yarn guide hole location before you finish the body, so you can stretch the stitch while the cord is still easy to manipulate.
Step-by-Step Instructions
Base (Color A)
Rnd 1: MR, 6 sc into the ring (6 sts).
Rnd 2: inc in each st around (12 sts).
Rnd 3: [sc, inc] x6 (18 sts).
Rnd 4: [2 sc, inc] x6 (24 sts).
Rnd 5: [3 sc, inc] x6 (30 sts).
Rnd 6: [4 sc, inc] x6 (36 sts).
Rnd 7: [5 sc, inc] x6 (42 sts).
Rnd 8: [6 sc, inc] x6 (48 sts).
Rnd 9: [7 sc, inc] x6 (54 sts). Do not fasten off.
Body (Color A, then B, then A)
Rnd 10: ch 1, sc in blo of each st around (54 sts).
Rnd 11: ch 1, [fpsc, bpsc] around (54 sts).
Rnds 12–19: repeat Rnd 11 (54 sts).
Change to Color B.
Rnds 20–21: repeat Rnd 11 (54 sts).
Change to Color A.
Rnds 22–29: repeat Rnd 11 (54 sts). Fasten off.
Edging (Color A)
Join Color A at the top edge, ch 1, sc in each st around (54 sts). Fasten off.
Yarn Guide Hole
At the front of the bowl, between Rnds 15 and 16, use your fingers to stretch a stitch open to create a small hole approx. 0.5 inch (1.3 cm) wide. Reinforce the edges with Color A if needed.
Face Applique (Color C)
Eye (make 2): MR, 4 sc, sl st to join (4 sts). Fasten off, leaving a tail for sewing.
Mouth: ch 6, sc in 2nd ch from hook, sc in next 3 ch, 3 sc in last ch, turn, sc in next 4 sts (11 sts). Fasten off, leaving a tail for sewing.
Assembly and Finishing
Sew the two eyes to the front of the bowl above the mauve stripe, centered and about 1 inch (2.5 cm) apart, using the tails and a tapestry needle. Sew the mouth below the eyes, centered, with its straight edge facing up. Weave in all ends securely on the inside of the bowl. Block lightly by misting with water and shaping the bowl over a cup or jar to hold its round shape while it dries.
Pro Tips and Variations
- Swap the black face for a pastel or glow-in-the-dark cord for a softer or spookier look.
- Add a second stripe in a contrasting color, or make the stripe three rounds wide for a bolder band.
- Work the base in a stiffer cord or add a cardboard circle inside the bottom for extra stability on slippery surfaces.