Boho Snowman in a Gold Poncho Crochet Free Pattern
Boho Snowman in a Gold Poncho – Free Crochet Pattern
Introduction
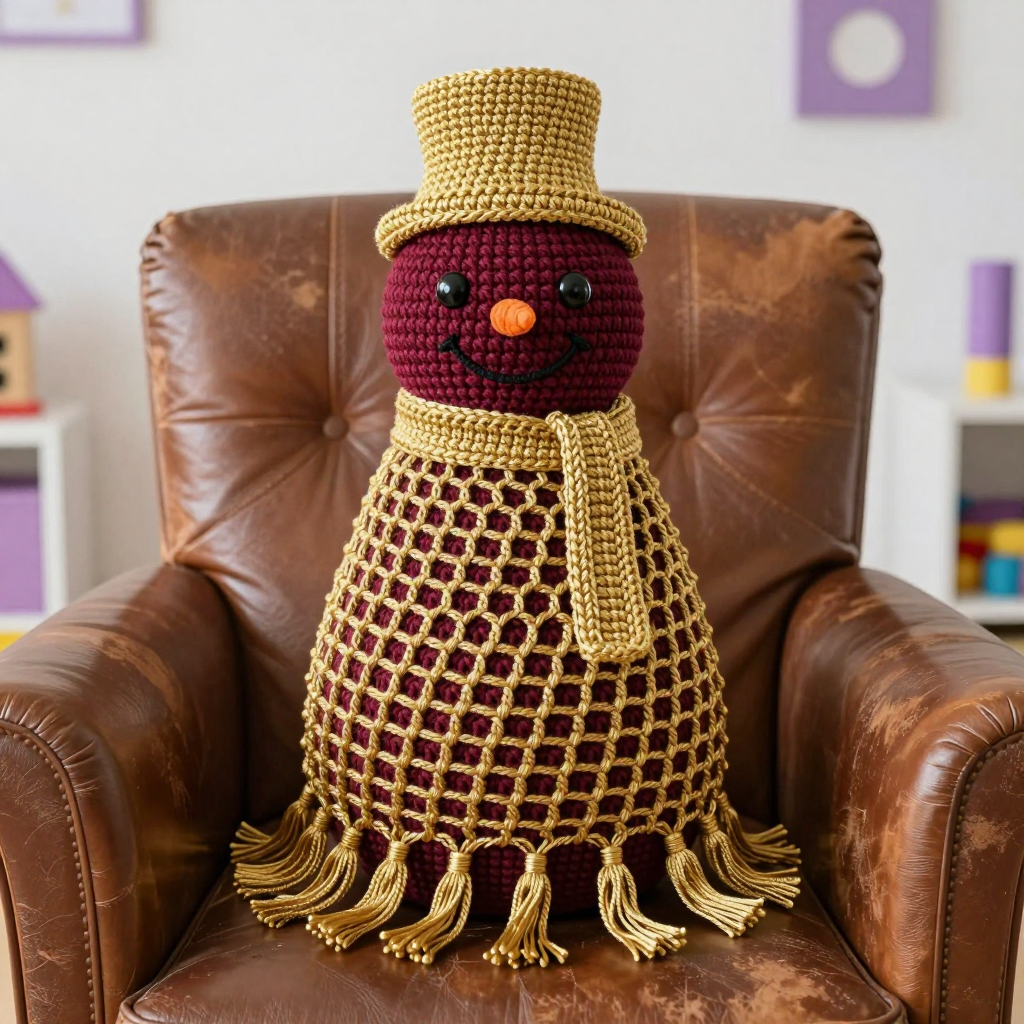
This little boho snowman is the perfect quick make for anyone who wants a festive friend without a mountain of seaming. He's worked in a warm burgundy cotton, with a gold openwork poncho draped from the neck down and finished with a swingy tassel fringe. At just 4 inches tall, he fits on a desk, a shelf, or in a gift bag, and his soft cotton texture makes him lovely to hold. Beginners will love that the body is one no-sew piece and the poncho is crocheted right onto it, so there's almost nothing to assemble.
Materials Needed
- Yarn: DK weight, 100% cotton, 50 g / 125 yds per skein.
- Color A (burgundy): 30 yds
- Color B (gold): 20 yds
- Small amount of black for eyes and mouth
- Small amount of orange for the nose
- Hook: 3.0 mm (US D/3) crochet hook
- Notions: tapestry needle, scissors, polyester fiberfill for stuffing, stitch marker
- Finished size: Approx. 4 inches (10 cm) tall including hat, 3 inches (7.5 cm) wide at the base
Abbreviations
- MR – magic ring: a loop of yarn you work your first stitches into, then pull closed
- sc – single crochet
- inc – increase: work 2 sc into the same stitch
- dec – decrease: work 2 stitches together into 1 sc
- ch – chain
- sk – skip the next stitch
- sp – space (the gap made by a chain)
- sl st – slip stitch
- st(s) – stitch(es)
- R / Rnd – round
- [ ] x6 – repeat the instructions inside the brackets 6 times
Gauge
20 sc x 22 rounds = 4 inches (10 cm) in single crochet. Work a small swatch in the round and measure across the middle; adjust your hook size if needed so your snowman comes out at the right size.
Tips Before You Start
- Stuff the body firmly as you work the decrease rounds (R13–R15) so the snowman keeps a round, even shape and doesn't go lumpy at the top.
- Use a stitch marker at the start of each round — the body and hat are worked in continuous spirals, so it's easy to lose your place.
- Keep your poncho chains loose and even; tight ch-1 spaces make the mesh pull in and the poncho won't drape nicely.
- Embroider the face before you sew on the hat, so you can see the whole head and center the features easily.
Step-by-Step Instructions
Body (Color A)
R1: MR, 6 sc (6 sts)
R2: inc x6 (12 sts)
R3: [sc, inc] x6 (18 sts)
R4: [2 sc, inc] x6 (24 sts)
R5–12: sc in each st around (24 sts)
R13: [2 sc, dec] x6 (18 sts)
R14: [sc, dec] x6 (12 sts)
R15: dec x6 (6 sts)
Fasten off, leaving a tail. Weave the tail through the last 6 sts and pull to close. Stuff firmly while working the decrease rounds.
Poncho (Color B)
Join Color B to any stitch of R12 of the body.
R1: ch 1, sc in same st, sc in each st around, join with sl st to first sc (24 sts)
R2: ch 1, sc in same st, [ch 1, sk next st, sc in next st] around, join with sl st to first sc (12 sc, 12 ch-1 sps)
R3–8: ch 1, sc in same st, [ch 1, sc in next ch-1 sp] around, join with sl st to first sc (12 sc, 12 ch-1 sps)
Fasten off.
Tassel Fringe (Color B)
Cut 12 strands of Color B, each 4 inches (10 cm) long. Fold each strand in half, use the hook to pull the fold through a ch-1 space of R8 of the poncho, then pull the ends through the fold to secure. Repeat in every ch-1 space around (12 tassels). Trim ends evenly.
Hat (Color B)
R1: MR, 6 sc (6 sts)
R2: inc x6 (12 sts)
R3: [sc, inc] x6 (18 sts)
R4–5: sc in each st around (18 sts)
R6: [sc, dec] x6 (12 sts)
R7: sc in each st around (12 sts)
Fasten off, leaving a long tail for sewing.
Scarf (Color B)
Row 1: ch 21, sc in 2nd ch from hook and each ch across (20 sts)
Fasten off. Tie around the neck, overlapping the top of the poncho.
Face
With black, embroider two eyes as French knots 2 sts apart on R6 of the body. With orange, embroider a small carrot nose between the eyes. With black, embroider a smile below the nose.
Assembly and Finishing
Sew the hat to the top of the head using the long tail, then tie the scarf around the neck so it overlaps the poncho top. The poncho is already attached at the neck, so no seaming is needed there. Weave in all ends on the wrong side, tucking the fringe ends neatly. Gently shape the body and poncho with your fingers, and lightly steam-block the poncho mesh and tassels so they hang straight.
Pro Tips and Variations
- Swap the burgundy for forest green or cream for a different holiday palette, keeping the gold poncho as the accent.
- Add a tiny gold bead or a small pom-pom to the tip of the hat for extra boho sparkle.
- Make a mini version by using sport weight yarn and a 2.5 mm hook — just keep your gauge consistent so the proportions stay right.