Teal Ribbed Lemon Slice Dog Mat - Free Crochet Pattern
Introduction
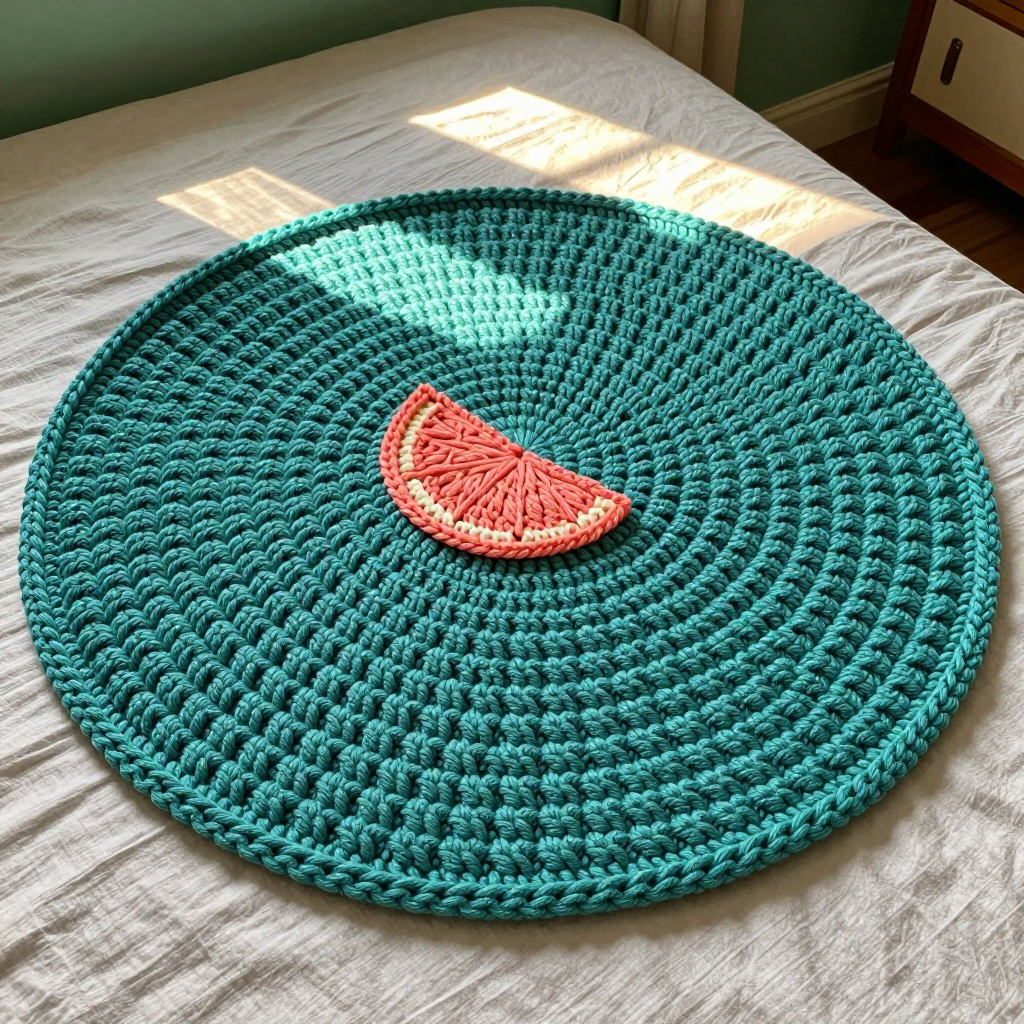
This teal ribbed lemon slice dog mat is a cozy, flat circular mat made in soft bulky wool, perfect for small dogs, cats, or any pet who loves a warm spot to curl up on. The front and back post ribbing gives the whole surface a gentle rippled, radially ribbed texture that looks lovely and feels even better under paws. A single coral half-circle lemon-slice appliqué sewn in the center adds a cheerful pop of color without any fuss. It is a relaxing, repetitive project that works up quickly in bulky yarn and makes a wonderful gift for a furry friend.
Materials Needed
- Yarn: Bulky weight (category 5) wool — approx. 400 yards teal (Color A) and 50 yards coral (Color B)
- Hook: 6.5 mm (K-10.5) crochet hook
- Notions: Yarn needle, scissors, stitch marker (optional, for marking the start of rounds)
- Finished size: Approx. 30 inches (76 cm) diameter
Abbreviations
- ch — chain
- sl st — slip stitch
- dc — double crochet
- fpdc — front post double crochet (work the double crochet around the post of the stitch below, from the front)
- dc2tog — double crochet two stitches together (a decrease)
- st(s) — stitch(es)
- rnd(s) — round(s)
- rep — repeat
Gauge
12 stitches and 12 rounds = 4 inches (10 cm) in the front/back post ribbing pattern. To check your gauge, crochet a small swatch in pattern, measure a 4-inch section, and adjust your hook size if needed.
Tips Before You Start
- Use a stitch marker at the beginning of each round so you never lose your place in the joined rounds.
- Keep your tension relaxed and even — tight front post stitches can make the mat cup instead of lying flat.
- Lay the mat flat on a table every few rounds to check it is staying flat; if it ruffles, your increases are too tight or your hook is too small.
- Wool yarn blocks beautifully, so don't worry if the mat looks slightly uneven before finishing — blocking will smooth it out.
Step-by-Step Instructions
Mat (Color A)
Ch 4, join with sl st to form ring.
Rnd 1: Ch 3 (counts as dc), 11 dc in ring, join with sl st to top of ch-3 (12 dc).
Rnd 2: Ch 3, fpdc around same st, *dc in next st, fpdc around same st; rep from * around, join (24 sts).
Rnd 3: Ch 3, fpdc around next st, *dc in next st, fpdc around next st; rep from * around, join (36 sts).
Rnd 4: Ch 3, fpdc around next st, dc in next st, *dc in next st, fpdc around next st, dc in next st; rep from * around, join (48 sts).
Rnd 5: Ch 3, fpdc around next st, dc in next 2 sts, *dc in next st, fpdc around next st, dc in next 2 sts; rep from * around, join (60 sts).
Rnd 6: Ch 3, fpdc around next st, dc in next 3 sts, *dc in next st, fpdc around next st, dc in next 3 sts; rep from * around, join (72 sts).
Rnd 7: Ch 3, fpdc around next st, dc in next 4 sts, *dc in next st, fpdc around next st, dc in next 4 sts; rep from * around, join (84 sts).
Rnd 8: Ch 3, fpdc around next st, dc in next 5 sts, *dc in next st, fpdc around next st, dc in next 5 sts; rep from * around, join (96 sts).
Rnd 9: Ch 3, fpdc around next st, dc in next 6 sts, *dc in next st, fpdc around next st, dc in next 6 sts; rep from * around, join (108 sts).
Rnd 10: Ch 3, fpdc around next st, dc in next 7 sts, *dc in next st, fpdc around next st, dc in next 7 sts; rep from * around, join (120 sts).
Rnd 11: Ch 3, fpdc around next st, dc in next 8 sts, *dc in next st, fpdc around next st, dc in next 8 sts; rep from * around, join (132 sts).
Rnd 12: Ch 3, fpdc around next st, dc in next 9 sts, *dc in next st, fpdc around next st, dc in next 9 sts; rep from * around, join (144 sts).
Rnd 13: Ch 3, fpdc around next st, dc in next 10 sts, *dc in next st, fpdc around next st, dc in next 10 sts; rep from * around, join (156 sts).
Rnd 14: Ch 3, fpdc around next st, dc in next 11 sts, *dc in next st, fpdc around next st, dc in next 11 sts; rep from * around, join (168 sts).
Rnd 15: Ch 3, fpdc around next st, dc in next 12 sts, *dc in next st, fpdc around next st, dc in next 12 sts; rep from * around, join (180 sts).
Rnd 16: Ch 3, fpdc around next st, dc in next 13 sts, *dc in next st, fpdc around next st, dc in next 13 sts; rep from * around, join (192 sts).
Rnd 17: Ch 3, fpdc around next st, dc in next 14 sts, *dc in next st, fpdc around next st, dc in next 14 sts; rep from * around, join (204 sts).
Rnd 18: Ch 3, fpdc around next st, dc in next 15 sts, *dc in next st, fpdc around next st, dc in next 15 sts; rep from * around, join (216 sts).
Rnd 19: Ch 3, fpdc around next st, dc in next 16 sts, *dc in next st, fpdc around next st, dc in next 16 sts; rep from * around, join (228 sts).
Rnd 20: Ch 3, fpdc around next st, dc in next 17 sts, *dc in next st, fpdc around next st, dc in next 17 sts; rep from * around, join (240 sts).
Fasten off. Weave in ends.
Lemon Slice Appliqué (Color B)
Ch 4, join with sl st to form ring.
Row 1: Ch 3 (counts as dc), 11 dc in ring, turn (12 dc).
Row 2: Ch 3, dc in next 5 sts, dc2tog, turn (7 sts).
Row 3: Ch 3, dc in next 4 sts, dc2tog, turn (6 sts).
Row 4: Ch 3, dc in next 3 sts, dc2tog, turn (5 sts).
Row 5: Ch 3, dc in next 2 sts, dc2tog, turn (4 sts).
Row 6: Ch 3, dc in next st, dc2tog, turn (3 sts).
Row 7: Ch 3, dc2tog, turn (2 sts).
Row 8: Ch 3, dc in next st, turn (2 sts).
Fasten off, leaving a long tail for sewing.
Assembly and Finishing
Pin the lemon slice appliqué to the center of the mat, with the straight edge of the half-circle facing outward as desired. Using the long tail and a yarn needle, sew the appliqué in place around its edge with small, even stitches, then secure the tail on the wrong side. Weave in all remaining ends. Block the mat by misting it lightly with water and pinning it flat to its full 30-inch diameter, then let it dry completely before giving it to your pet.
Pro Tips and Variations
- Swap the coral appliqué for a different color — pale yellow or cream gives a classic lemon look, while any bright shade makes a fun accent.
- For a thicker, more cushioned mat, hold two strands of bulky yarn together and go up one hook size.
- Add a simple single crochet border around the outer edge for a tidier finish, or leave it as is for a clean, flat look.