Striped Cable Coat with Flower Buttons Free Knitting Pattern
Introduction
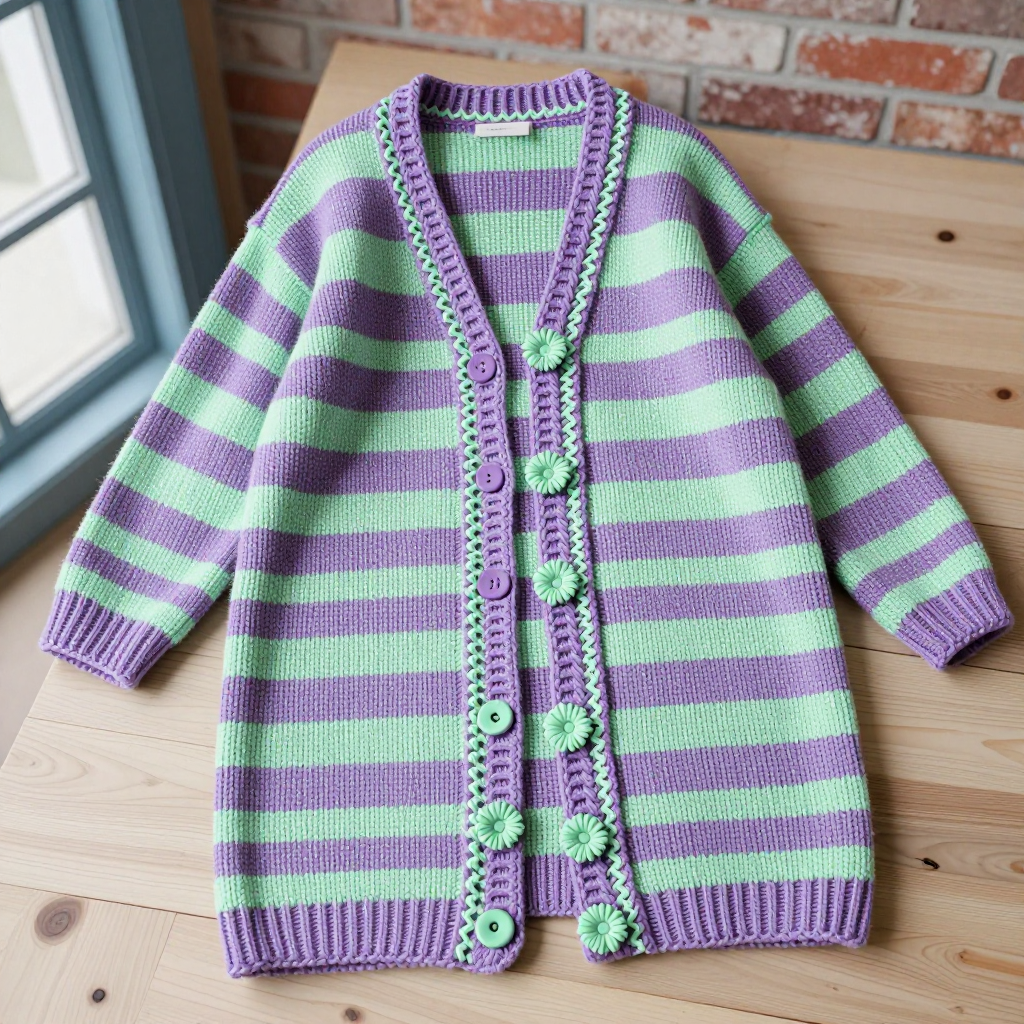
This oversized striped cable coat is the kind of piece that makes an outfit feel finished without any effort at all. It is written for knitters who are comfortable with knit and purl stitches and ready to try a simple four-stitch cable, and it comes together from wide, straight rectangles, so there is no complicated shaping to worry about. Horizontal two-row stripes of lavender and mint give it a soft, calm, Japandi feel, while a narrow cable runs up each front edge like a quiet vertical accent. The wide, boxy shape drapes easily over everything from a tee to a chunky sweater, and five round knitted daisy buttons in a contrast color add a playful, handmade touch.
Materials Needed
- Yarn: Worsted weight cotton (approx. 200 yds per 100g skein). Lavender (A): 600 yds. Mint (B): 600 yds. Contrast color for buttons (C): 50 yds.
- Needles: 5.0 mm (US 8) straight needles.
- Notions: Cable needle, stitch markers, stitch holders (or scrap yarn), tapestry needle, small amount of fiberfill for the daisy buttons.
- Finished size: Oversized fit, to fit bust 34–46 inches. Width 50 inches, length 28 inches, sleeve length 18 inches.
Abbreviations
- CO: cast on — make the starting stitches.
- st(s): stitch(es).
- st st: stockinette stitch — knit on right-side rows, purl on wrong-side rows.
- RS / WS: right side / wrong side of the work.
- k: knit.
- p: purl.
- kfb: knit into the front and back of the same stitch — makes one extra stitch.
- k2tog: knit two stitches together — decreases by one stitch.
- yo: yarn over — wraps the yarn to make an extra stitch (and a small hole).
- C4F: cable 4 front — slip 2 sts to the cable needle and hold at the front, k2, then knit the 2 sts from the cable needle.
- inc: increase — here, work kfb into the first and last stitch of the row.
- BO: bind off.
- beg: beginning.
Gauge
18 sts and 24 rows = 4 inches in stockinette stitch on 5.0 mm (US 8) needles. Knit a 6-inch swatch in stockinette, block it lightly, and count stitches and rows over 4 inches before you begin; if you have more stitches than 18, go up a needle size, and if you have fewer, go down.
Tips Before You Start
- Carry the unused color loosely up the side edge rather than cutting it at every stripe change — with two-row stripes you will change color constantly, and a relaxed float keeps the edges from pulling in.
- Always change colors on the wrong-side row so the little jog sits on the inside of the coat and the right side shows clean stripes.
- Write out the cable rows on a small card and tick them off as you go; the cable panel repeats every 4 rows and is easy to lose track of while you are also managing stripes.
- Because the coat is knitted flat from wide rectangles, use a long circular needle as a straight needle if your stitch count feels crowded — it takes the weight off your wrists.
Step-by-Step Instructions
Back
Row 1: With A, CO 90 sts. Work 2 rows in st st.
Row 3: Change to B and continue in st st, working stripes of 2 rows A, 2 rows B alternately.
Rows 4–156: Continue in st st in the 2-row stripe sequence until piece measures 26 inches, ending with a WS row (90 sts).
Next row (RS): BO 30 sts, knit to end (60 sts).
Next row (WS): BO 30 sts, purl to end (30 sts).
Place remaining 30 sts on a holder for the neck.
Left Front
Row 1: With A, CO 50 sts. Work 2 rows in st st.
Row 3: Change to B and continue in st st with the same 2-row stripe sequence as the Back, keeping the cable panel on the first 8 sts (the front edge) as follows.
Row 1 (RS): k2, p2, k4, p2, k to end (50 sts).
Row 2 (WS): p to last 10 sts, k2, p4, k2, p2 (50 sts).
Row 3: k2, p2, C4F, p2, k to end (50 sts).
Row 4: as Row 2 (50 sts).
Rows 5–156: Repeat Rows 1–4 of the cable panel, keeping the stripe sequence on the remaining sts, until piece measures 26 inches, ending with a WS row (50 sts).
Next row (RS): BO 30 sts, work to end (20 sts).
Place remaining 20 sts on a holder for the neck.
Right Front
Row 1: With A, CO 50 sts. Work 2 rows in st st.
Row 3: Change to B and continue in st st with the same 2-row stripe sequence as the Back, keeping the cable panel on the last 8 sts (the front edge) as follows.
Row 1 (RS): k to last 10 sts, p2, k4, p2, k2 (50 sts).
Row 2 (WS): p2, k2, p4, k2, p to end (50 sts).
Row 3: k to last 10 sts, p2, C4F, p2, k2 (50 sts).
Row 4: as Row 2 (50 sts).
Rows 5–156: Repeat Rows 1–4 of the cable panel, keeping the stripe sequence on the remaining sts, until piece measures 26 inches, ending with a WS row (50 sts).
Next row (WS): BO 30 sts, work to end (20 sts).
Place remaining 20 sts on a holder for the neck.
Sleeves (make 2)
Row 1: With A, CO 50 sts. Work 2 rows in st st.
Row 3: Change to B and continue in st st with the 2-row stripe sequence as for the Back.
Rows 4–63: Inc 1 st at each end every 6th row 10 times (70 sts).
Rows 64–108: Work even in st st and stripes until piece measures 18 inches (70 sts).
BO all sts.
Button Loops (make 5)
With C, CO 3 sts. Work i-cord for 1 inch (knit 3, slide stitches to the other end of the needle, repeat). BO.
Daisy Buttons (make 5)
Row 1: With C, CO 6 sts. kfb in each st (12 sts).
Row 2: p (12 sts).
Row 3: kfb in each st (24 sts).
Row 4: p (24 sts).
Row 5: k2tog across (12 sts).
Row 6: p (12 sts).
Row 7: k2tog across (6 sts).
Cut the yarn, thread it through the remaining 6 sts and pull tight. Stuff lightly with fiberfill and sew the opening closed.
Petal edging: With C, pick up 1 st in each of the 6 cast-on sts (6 sts).
Row 1: kfb in each st (12 sts).
Row 2: p (12 sts).
Row 3: [k1, yo, k1] in each st (24 sts).
Row 4: p (24 sts).
BO loosely. Sew the petals to the sphere.
Assembly and Finishing
Sew the shoulder seams. Sew the sleeves into the armholes, matching the center of each sleeve to the shoulder seam. Sew the side seams and the sleeve seams. Neckband: with RS facing and using A, pick up and knit 20 sts from the right front neck, 30 sts from the back neck and 20 sts from the left front neck (70 sts). Work 2 rows in st st, change to B, work 2 rows in st st, then BO loosely. Front bands: with RS facing and using A, pick up and knit 80 sts along the right front edge. Work 2 rows in st st, change to B, work 2 rows in st st, then BO loosely. Repeat for the left front edge. Sew the button loops evenly along the right front band and sew the daisy buttons opposite the loops on the left front band. Weave in all ends and block to the finished measurements (width 50 inches, length 28 inches, sleeve length 18 inches).
Pro Tips and Variations
- Swap the two-row stripes for wider four- or six-row stripes in the same colors for a bolder, more graphic look — the yardage stays the same.
- Work the daisy buttons in lavender instead of the contrast color for a quieter, tone-on-tone finish, or use a scrap of smooth cotton so the petals hold their shape.
- For a lighter spring version, knit the sleeves three-quarter length (about 14 inches) and add a single crochet edge in A around the cuffs and hem.