Mint Kitty Halter Top Free Crochet Pattern
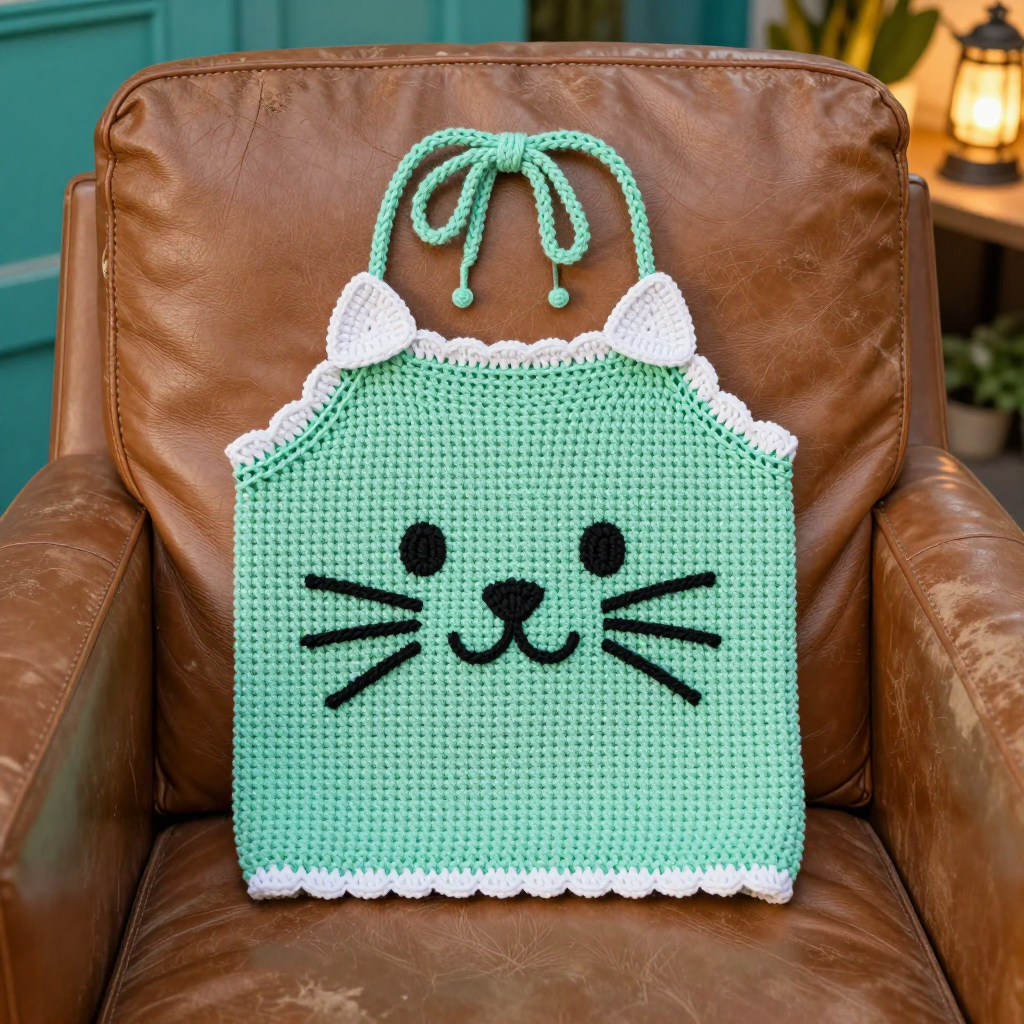
Mint Kitty Halter Top Free Crochet Pattern
Introduction
This sweet little halter top is made for anyone who wants a quick, wearable summer project with a playful kawaii twist. It is worked as one simple straight rectangle in soft mint green cotton, so there is no shaping, no armholes, and no complicated construction to worry about. The magic happens at the top edge, where a row of tiny white scallops, two little triangle ears, and a few embroidered whiskers turn a plain rectangle into a smiling kitty face. The finished piece is light, breathable, and smooth against the skin, perfect for warm days and beach trips.
Materials Needed
- Yarn: (4) Medium Weight / Worsted Weight, 100% cotton. Main color (MC) mint green: 200–300 yd. Contrast color (CC) white: 20 yd. Black embroidery floss for the whiskers.
- Hook: 5.5 mm (US I/9).
- Notions: Tapestry needle, embroidery needle, scissors, stitch markers, measuring tape.
- Finished size: Customizable. Width = your desired bust coverage (about 14 in for XS, 16 in for S, 18 in for M, 20 in for L). Height = underbust to neckline (about 12 in).
Abbreviations
- ch – chain: make a loop of yarn and pull it through the loop on your hook.
- sc – single crochet: insert hook, yarn over, pull up a loop, yarn over, pull through both loops.
- dc – double crochet: yarn over, insert hook, pull up a loop, yarn over and pull through two loops twice.
- sl st – slip stitch: insert hook, yarn over, pull through both the stitch and the loop on your hook.
- sk – skip: leave the next stitch unworked.
- st(s) – stitch(es).
- rep – repeat.
- RS – right side: the front, outward-facing side of the fabric.
- MC / CC – main color (mint) / contrast color (white).
Gauge
3.5 single crochet stitches and 4 rows = 1 inch. Work a small swatch in sc and measure a 4-inch section in the middle to check that you match before starting.
Tips Before You Start
- Measure your bust coverage and length first, then write down your width (W) and length (L) in inches so you can follow the pattern without recalculating.
- Keep your starting chain a multiple of 2 chains so the scallop trim spaces evenly across the top edge.
- Cotton has little stretch, so hold your tension relaxed and even; a stiff rectangle will not drape as nicely across the bust.
- Work the scallop trim and ears in the same white yarn lot so the kitty details match perfectly.
Step-by-Step Instructions
Body (one rectangle, MC)
Setup: Measure your bust width (W) and desired length (L). Chain until the chain measures W inches, making sure the count is a multiple of 2.
Row 1: Sc in the 2nd ch from hook and in each ch across, turn. (Your stitch count equals the number of chains minus 1; for example, a 14-inch width at gauge gives about 49 sts.)
Rows 2–L: Ch 1, sc in each st across, turn. Repeat until the piece measures L inches tall (about 12 in, or 48 rows at gauge). Fasten off.
Neck Ties (make 2, MC)
Tie: Ch 80, then sl st in the 2nd ch from hook and in each ch across. Fasten off, leaving a long tail for attaching.
Scallop Trim (CC)
With RS facing, join CC at the top right corner of the rectangle.
Trim row: *Sk 1 st, 5 dc in the next st, sk 1 st, sl st in the next st; rep from * across the top edge. Fasten off.
Ears (make 2, CC)
Row 1: Ch 2, 2 sc in the 2nd ch from hook, turn. (2 sts)
Row 2: Ch 1, 2 sc in each st across, turn. (4 sts)
Row 3: Ch 1, sc in each st across. (4 sts) Fasten off, leaving a tail for sewing.
Assembly and Finishing
Attach one end of each neck tie to the top corners of the rectangle with a few secure stitches. Sew the ears to the top edge, about 2 inches in from each side. With black embroidery floss, embroider whiskers on each side of the center front using 3 straight stitches per side radiating outward. Weave in all ends neatly on the wrong side. Block lightly by misting with water and pinning flat to the measurements, then let it dry completely before wearing.
Pro Tips and Variations
- Add a second row of scallops in white along the bottom edge for a fully trimmed look.
- Swap the mint for any pastel cotton and change the ear color to match for a different kitty.
- Make the ties longer or shorter to suit how high you like the halter to sit at the neck.